

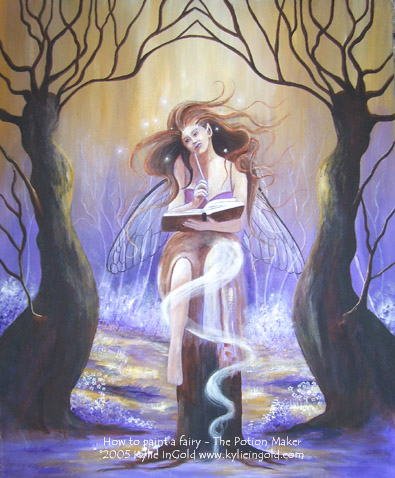
How to Paint a Fairy – The Potion Maker
How to Paint a Fairy – The Potion Maker
Tutorial Walkthrough ©2005 Kylie InGold
This painting tutorial/lesson or walkthrough is step by step of the Potion Maker
This is just one of the ways I may approach a painting.
Don’t forget to read the other tutorials for different approaches.
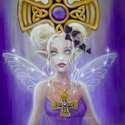
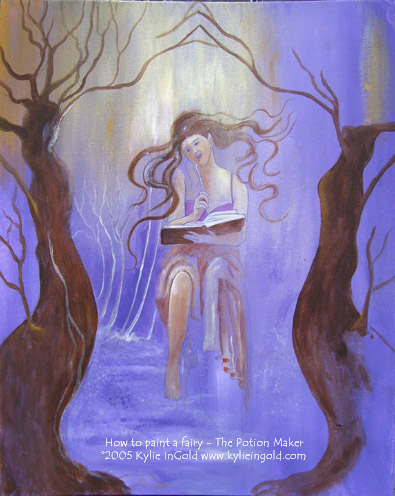
In starting most of my paintings, I don’t have a huge plan, sometimes, I just want to paint a certain colour and they usually have something to do with where I am at the time. As in this painting. I had a tragedy happen in 2005 (that’s in my bio page). It was suggested that I journal all my feelings. I also just wanted to paint purple, purple is supposed to a healing color. I painted a lot of purple paintings during this time.
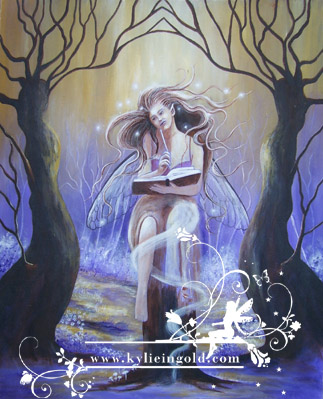
Jessica posed for this, I had her in all sorts of poses, took lots of photographs, She makes a great fairy! To take the painting away from my tragedy, I called her the fairy potion maker, because that is what she looks like she is doing. This painting isn’t finished. But there is enough info to help you along.
Materials Required
»Canvas 20″ x 16″
»White transfer paper
»Chalk
»Brushes: (Sable or Taklon)
—1 inch wide brush (with long hair [1" and 1/4 long]
—1/2 inch wide brush
—1/4 inch wide
—00 Liner Brush
—Small Round (This one is optional)
»Paint:
—White, Burnt Sienna, Diox purple,
yellow ochre /oxide,
cobalt blue (or ultramarine)
(I prefer and recommend Matisse Artists Acrylics)
Step 1
Remember.
When you are painting. Take a step back, go off and do something else for a little, with a little imagination you will start to see trees or other wonders appear just in your brush stokes.
It is better to prepare your canvas before you paint.
you can do this while you are sketching your drawing.
Canvases these days are very dry, you could either, paint 3 or 4 coats of white (acrylic house paint is good for this), In this painting I just did extra coats of the background mixture below.
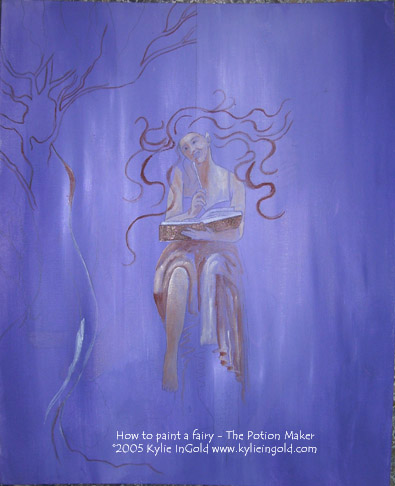
The initial fairy was drawn onto paper the same size as I wanted her to be.
If you are just starting. You will need to start to train your eyes. When doing your drawing, make sure you include the “Shadows”. A trick for this is to almost close your eyes and then look at your reference material. You should be able to see the differences between the lights and the darks. I then transferred the sketch onto the canvas using transfer paper (it is like carbon paper and you can get it from any good artist supplier. You can get it in black and white sheets).
I used white transfer paper in this painting, and then I went over those lines lightly with a pencil. I only sketched up the fairy, the trees I just did freehand.
Tip: Never mix a secondary colour with white.
If you follow this rule your paintings will not become muddy.
In this example purple is a secondary color.
Purple is made up of Red and Blue. I add a little of the blue to the white (About 5 drops into a 20 cent piece size of white). Then I add that blue mixture to the purple, that way the purple stays crisp. I called this mixture.
“Dusk”
The background is painted with the 1″ brush, diox purple, cobalt blue and white. In vertical brush strokes from top to bottom,
As it is acrylics the paint will dry quickly, so do a section at a time. A section would be about 20 cm wide. The brush is double loaded. Which means I have diox purple on one corner and my blue and white mixture on the other corner. I then added the tree and outlined her hair with a burnt sienna and a little water (about 4 drops of water in a 5 cents size portion of burnt sienna.)
Step 2
I painted the ground with horizontal brush strokes, and then added shrubs. Painted over the trees, you paint them back later.
I have 2 one inch brushes. One is kept like it is brand new from the shop, the other is flared out and wrecked. This is my tree and shrub brush. I have done the same to a half inch brush and that is my moss brush.
You can make one of yours into a tree brush by
standing it upright in a jar of boiling hot water, you may need to repeat this, usually with a new brush, my students have to repeat this about 5 times.
Do paint the shrubs, I used my tree brush, and picked up some a lighter mix of diox purple using on half of the brush and just dab, dab, dab, while it is still wet I pick up some of my “dusk” mixture and dab, dab, dab. Then I wash the brush, dry the brush (turn the brush over…just joking) When the top part of the shrub is dry then I add another bit of the dusk, and then when that is dry, I add pure white to highlight.
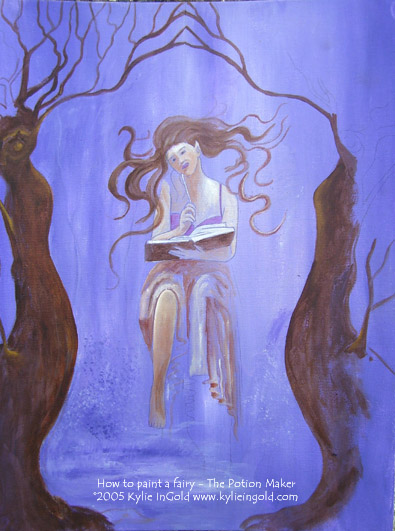
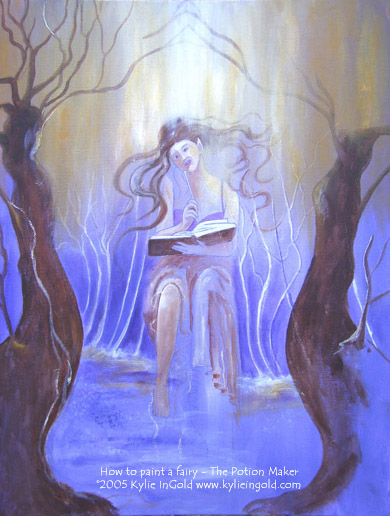
The tree on the left looked like it had a face so I decided to paint one in and then added that in the sketch on the second tree, I’ve started to adding color to the fairy. This is just using burnt sienna and white and the smaller brushes. Following your reference material as to where the darks and lights are on her body. As I had painted over the trees, I then repainted them again.
Step 3
While I wait for the paintings to dry I do other jobs.
My paintings sit on the easel I started to see a trees in the background just from the brushstrokes in the paint. I had intended from the beginning that the painting was going to be purple and yellow, love those colors together.
I could see some trees from a couple of my brushstrokes in the background. I added them using white and the liner brush. I started adding on the yellow ochre.
Dark at the edges and light in the middle.
The dark is just pure yellow ochre and as I move into the middle I start adding white to the wet yellow ochre on the canvas, not on the pallete and blended it.
I keep all the colours on my palette pure. Except for my sunshine and dusk mixtures! My brush is a clean before I dip it into the paint. I double load the brush, one color on one corner of the brush,
the other colour I choose to mix on the other corner of the brush.
Step 4
Painted more of the yellow ochre and white in the background in vertical brush strokes and added some to the ground in horizontal brush stokes.
In this example you can see how I have painted over her hair and even some of her body. You may think that this makes for unnecessary extra painting. Doing this means those colours actually become part of everything.
Have to wait for her to dry now.
Step 5
Painted the trees back in with burnt sienna and a little water, added some highlight on one trunk with yellow ochre and white (double loaded). Added some white shrubs at the bottom of the white trees using the tree brush and the dab, dab, dab method, a little more yellow ochre to the ground following contour in horizontal brushstrokes.
Worked a little on her hair with the 1/4″ brush following the contour of her hair. Added a little highlight. Did a lot of work on her face, again lots of thin layers of the burnt sienna and white, I double load the brush, then I use white and rub it with my finger to blend.
Time for her wings. These are drawn in with white chalk, and so is the stump she is sitting on. Chalk is great, you can sharpen it with an exacto/stanley knife.
You can rub it out with your finger. It is easy to remove with a little water on a clean brush.
No happy with the shape of her wings, I want them to be falling downwards. Hmmmm.
Step 6

Spent sometime working on her hair, lots of thin layers. Now with the 1/4″ brush, the small round, and the liner brush. Painted in the stump, again following contour. The stump is a broken tree, trees, grow upwards, brush strokes therefore, go vertical. When doing the roots of the stump I follow my brush along the lines, wiggling it. Took out her wings.
Step 7
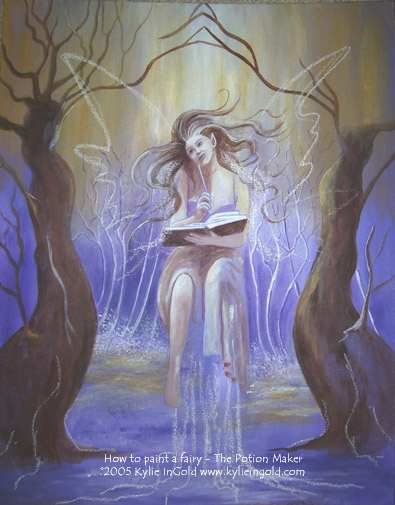
Started to add some Fairy sparkle bling around her hair. This was done with the liner brush using just a dot of white paint. I felt the yellow ochre background wasn’t light enough, in the middle so I did another layer and painted over bits of the painting again. Darn will have to paint those trees back again! Did more work on the background. I know where the painting is going now,
so I add all the bits in the background now before I have to paint the trees in the foreground back.
Step 8
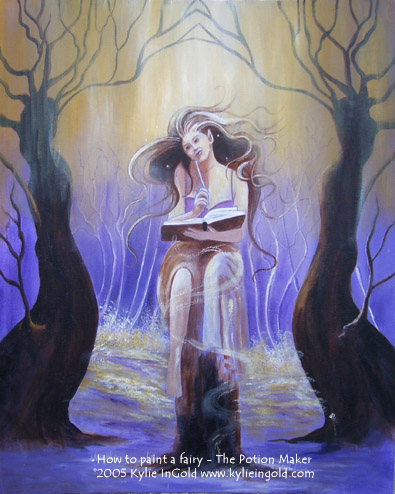
So, I’ve added different wings now, I am happy with these. Did a lot of work on the ground, lots of layers following the horizontal contour of the ground, some little shrubs using the dab, dab, method above. added some little flower just with pure white.
Worked on her hair some more. The color is different now, it is made up by double loading the brush with burnt sienna and yellow ochre.
Added some more fairy sparkle bling. People always ask me how to do this. It is so much easier to show you than to explain in words.
First, put a dot of white, wait for that to dry, then do another dot this time with a little water, then blend that in a circle with your finger. You may need to repeat this process a number of times. It is much easier to get this effect with oil paint. It is about how much water you use each time you blend. Persevere, you’ll get it.
Step 9
This is where I have got to now. Added even more fairy sparkles. Added some mushrooms to the bottom of the tree stump.
What’s left to do. I need to misty her up a bit,
finish her legs and dress at the bottom. .
If you have any comments or questions regarding this art walk through.
Please put them in the guestbook.