

How to Paint a Fairy – The Sturt Pea Fairy
How to Paint a Fairy – The Sturt Pea Fairy
Tutorial Walkthrough ©2007 Kylie InGold
Updated 2013
I have a fairy oil painting that I started in 1998, every so often I bring her down. Maybe one day I’ll say she is finished. What do you think?
I had not been happy with the final version of this painting so six years later I decided to work on her again.
I’ve appended to this tutorial.
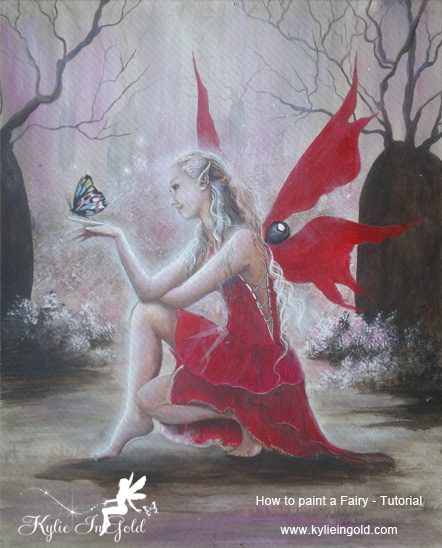
Sturt Pea Fairy
This painting tutorial/lesson or walkthrough is step by step of the Sturt Pea Fairy. From my Australian Wild Flower Fairies Series.
This is just one of the ways of may approach a painting.
Materials Required
»Canvas 20″ x 16″
»Brushes:
—1 inch wide brush (with long hair [1" and 1/4 long]
—1/2 inch wide brush
—1/4 inch wide
—00 Liner Brush
—Small Round (This one is optional)
»Paint:
—White, Burnt Sienna, Burnt Umber, Cadmium Red, Cobalt Blue.
(These colors are in most acrylic starter sets)
(I prefer and recommend Mattisse Artists Acrylics)
Step 1

The inital fairy was sketched onto paper the same size as I wanted her to be. I then transferred the sketch onto the canvas using transfer paper (it is like carbon paper and you can get it from any good artist supplier. You can get it in black and white sheets).
You could also just sketch straight onto the canvas, I find when I do that, the canvas gets dirty when I need to rub anything out.
So guess what I wanted to paint first? Straight on to the wings.
Blocked in with Cadmium Red. At this stage I haven’t a clue what the background is going to be.
Generally you are supposed to paint the background first, I’ll work around this.
Step 2
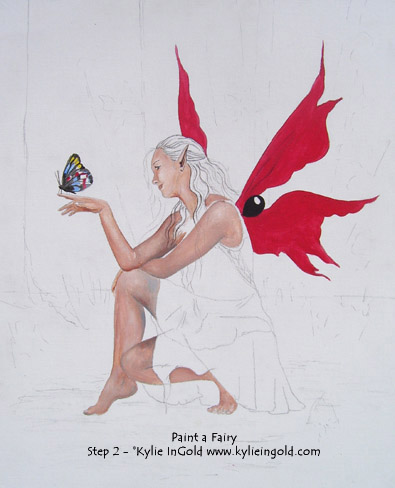
Painted the first coat on the butterfly, Started painting in the skin tones using the 1/2″ and 1/4″ inch brush with white, burnt sienna and cobalt blue. The paint here is mixed up to about the consistency of ink. About three thin layers have been painted on her skin. In this type of acrylic painting, you only use water to make the paint flow. A tiny amount of cobalt blue is added to the burnt sienna and used in the shadows on her skin. I’ve now also very lightly sketched in a horizon line and a tree shape on the left, I am starting to see where the painting may go.
Step 3
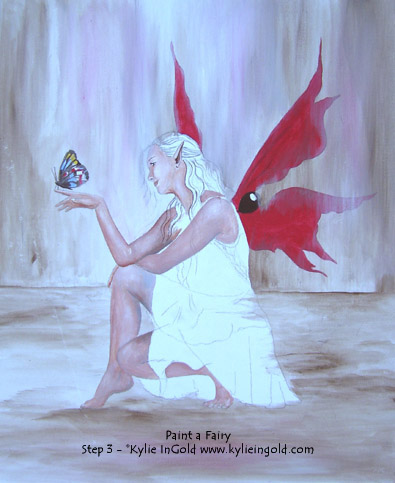
The Background: In the background I have used watered down
burnt umber and a pink made up from the cadmium Red and white. The ground is painted with horizontal brush strokes and the back part is vertical brushstokes. Painted with the large 1″ brush.
I painted over the fairy in places, if I painted around the wings etc., the background wouldn’t make sense and you would see those brushstrokes. If I do get paint on her skin, I’ll rub it with my finger so there are not lumps as I like my fairies skin to be smooth. I put the painting on the easle to dry. I’ve decided now that I will have bottle trees in the background.
Step 4
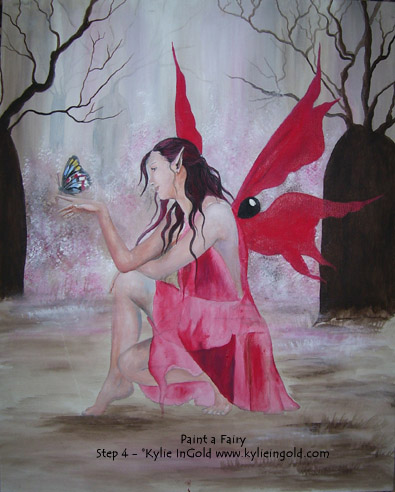
Woops! a few extra steps in here. I painted this bit in the evening I so the photos didn’t turn out.
I painted the trunks of the bottle trees and a couple of branches with burnt umber and enough water just for the paint to flow easily on the brush. I then painted the bottle trees in the background with the same paint but watered down a lot more.
Then painted over all the bottle trees just in the background with a watered down white with vertical brushstrokes, waited for that to dry then gave it a second coat and added a little pink in the middle. This gives the painting a misty look. The pink shrubs were done then with the 1″ inch brush with the brushes ends flared out with pink, white, and burnt umber. I double load the brush pink on one corner and burnt umber on the other and then dab, dab, dab, then pink on one corner and white on the other and then dab, dab, dab again.
Remember: You do need to paint over the fairy when you a doing your background.
I then painted over the background again with the watered down white solution so the whole background looks connected.
Added some pink to the ground using the 1″ brush which is sharpened. (A sharpened brush looks like you just bought it from the shop)
Now I painted the fairy again. Acrylic paintings have lots of coats, they are like a sarah lea cake “layer upon layer” Painted the wings again, the bottle trees in the foreground, and any skin that may have got background paint on)
Blocked in the hair, following the contour of the way the hair falls.
What does this mean? The hair at the top of the head goes around the head so my brush goes around, the hair falling down on her shoulders falls down and so on. Put some cadmium red on her dress.
Step 5
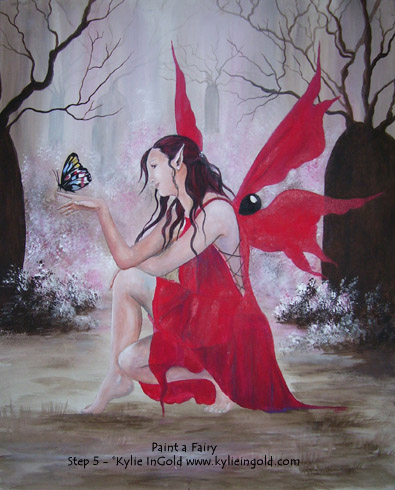
Added more layers of cadmium red paint to her dress. Did about another four layers of think paint on her skin. Added some shrubs at the front of the bottles trees with burnt umber, white and pink using the dab, dab, dab technique. Put another layer on the ground, this time the burnt umber paint was a bit thicker and still following contour with the brush strokes going horizontal. The grass is done by wiping the burnt umber paint a little thicker in a horizontal line and then flicking the wet paint upwards. This is so much easier to physically show someone how than to explain.
Step 6
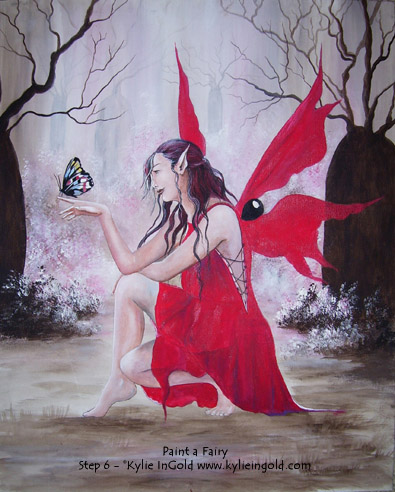
Stated working on her face and hair. She is not very pretty yet. The lips are wrong. In many of my paintings I will work on the face and the eyes first. The fine line work is done with burnt umber and the 00 liner brush. More paint on her dress. I just keep adding layers of paint, this is called fat over lean, which just means thick paint over thin paint.
The was the final picture in 2007, I’ve added numerous layers to her hair, with the pink, burnt umber and white, changed her hair around her face from how it was in step 6. Worked on the face and skin for a number of hours. Her face isn’t exactly what I had in mind. That’s the way it goes sometimes.
Added the fairy sparkly bling (explained in the fairy potion tutorial). Added some misty glow to her hand and foot. This is done with watered down white paint then rubbed with your finger lightly to blend, and then doing it a number of times until it looks glowy.
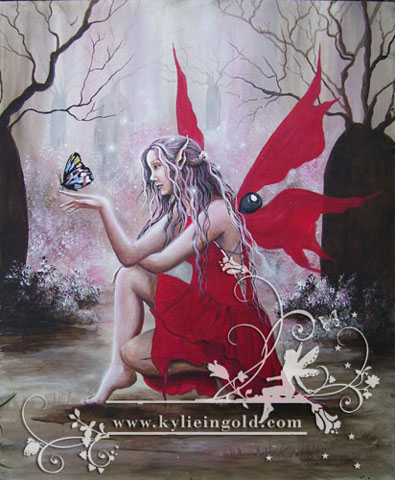
Update 2013
I felt her face and her hair were not just working and neither her dress.
I went back to my original reference for the fairy. I realized it was really just the chin line that was my problem….
How did I change/fix her? Firstly, I painted a thin white layer over her face and hair. There were a few bumps and lumps, I lightly sanded them off. I am happy with her face now. I still have more work to do on her hair and her dress.